Working with Agents in Eggplant Manager

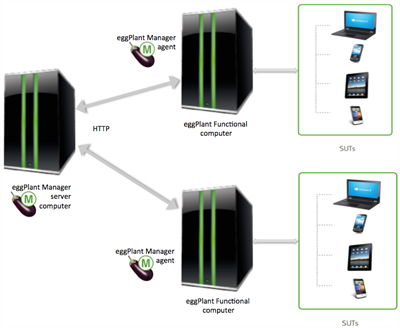
To set up an agent install it on the computer you want, then make it available to run tests by navigating to Admin > Agents on Eggplant Manager and creating a new agent.
After you create the agent, authorized users can specify that agent when they create a test schedule, or choose to run a test on demand. For on-demand test runs, the agent setting is in the Advanced options for Run Now. See the step-by-step instructions for Creating a Schedule and Running Tests on Demand for more information.
Installing an Agent
You must install an agent on each computer running an Eggplant Functional instance that you want Eggplant Manager to use for testing.
If the Eggplant Functional application you want to use is on a computer where your Eggplant Manager server is not running, you must also install an agent on that computer. To do this, install Eggplant Manager, then modify the Eggplant Manager configuration file to start only the agent.
Step by Step: Installing an Agent
To install an agent on a computer where your Eggplant Manager server is not running, follow these steps:
- Install Eggplant Manager as described in Installing and Licensing Eggplant Manager, but do not enter a license when prompted.
- When the Setup wizard finishes running, click Finish to close it. If a browser opened displaying the Eggplant Manager license page, close the browser without entering a license.
- Locate the Eggplant Manager configuration file (em_config.yml) by navigating to the appropriate Eggplant Manager installation directory for your operating system:
- Mac: /Library/TestPlant/cache
- Windows: C:\TestPlant\cache
- Linux: /opt/TestPlant/cache
- Use a text editor to edit the em_config.yml file and change the :process_to_start: option from em to agent.
- Save the em_config.yml file.
- Restart Eggplant Manager as described in Starting and Stopping an Agent to apply the changes you made to the em_config.yml file. After you restart Eggplant Manager, only the agent will be running. Note: After you complete this step, the agent runs as a service. You won't need to restart or manually start the Eggplant Manager agent unless you make and save additional changes to the em_config.yml file.
How Licensing Affects Agents
The Eggplant Manager agents do not require a license. However, agent operation and the number of tests you can run at the same time depend on the number of Eggplant Manager and Eggplant Functional licenses available.
When you create an agent in Eggplant Manager, you specify the number of tests the agent can run at the same time. This number is limited by the number of licenses available for Eggplant Functional and Eggplant Manager. See Licensing Eggplant Functional for more information.
Step by Step: Creating an Agent in Eggplant Manager
After you install an agent, you need to make it available to Eggplant Manager to run tests. The following steps guide you through creating an agent within Eggplant Manager:
- Launch your web browser and log in to Eggplant Manager with an Administrator user.
- Select Admin > Agents to navigate to the Agents page. Note: The Eggplant Manager Setup program configures and runs an agent named Local Host with the local host IP address: 127.0.0.1 on the Eggplant Manager server computer.
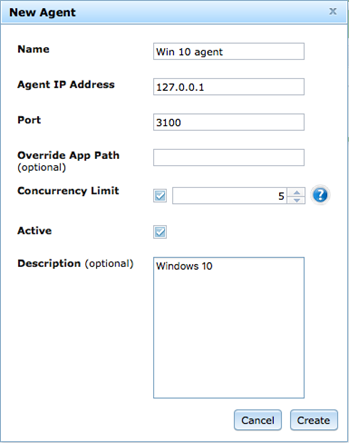
- Click New Agent. The New Agent dialog box opens.
- Provide the appropriate information for your new agent in the fields below:
- Name: A unique name for the agent (required).
- Agent IP Address: The IP address of the computer where your agent will run.
- Port: 3100 The required port for this agent. If the value you used when you installed the agent is different from port 3100, enter the correct value here.
- Override App Path: The path to the Eggplant Functional runscript or other executable when you are not using the runscript in the default install location.
- Concurrency Limit: The number of Eggplant Functional instances you want to run at the same time.Note: The number of instances is limited to the number of licenses available on that computer for use by Eggplant Manager.
- Active: Select this checkbox if you want this agent to be immediately available for use. Default value: Active (available).
- Description: A description for the agent (optional).
- Click Create. Your new agent now appears in the list of available agents.

Starting and Stopping an Agent
There are different methods to use to start and stop an agent on each operating system supported by Eggplant Manager.
Mac
Run the start.command or stop.command script to start or stop an agent. The scripts are installed in the following directory by default:
/Library/TestPlant/start.command or stop.command
Windows
Start the agent from the Windows Start menu: Start > All Programs > TestPlant > Eggplant Manager > Start Eggplant Manager (Agent Only).
To stop an agent, use the stop.bat script, which is installed in the following directory by default:
C:\TestPlant\stop.bat
Linux
Run the start.sh or stop.sh script to start or stop an agent. The scripts are installed in the following directory by default:
/opt/TestPlant/start.sh and stop.sh
Specifying an Agent for a Test Script
In Eggplant Manager, you can create tests, and then add scripts to those tests. You specify the agent at the script level, so you can choose a different agent for each script in a test. This means that a single test can work with more than one agent.
To learn more about this process, see Creating Tests and Adding Executables.
Checking an Agent's Status
The Eggplant Manager application has several tools to report agent statuses.
To find out if a script is actively running against an agent, do the following:
- Select Admin > Agents to navigate to the Agents page.
- Select the agent in which you are interested.
- Information about the process ID (PID), suite, and script shows below the Agent list. If no scripts are running, you see the message No running processes found.
From the Agents page click the Status button for an agent to check its status. After you click an agent's Status button, that agent reports one of the following status values:
- Green: Indicates that the agent is online and bidirectional communication with the server is possible.
- Black: Indicates that the agent status has not been checked. This indicator means that the agent might not be online. You must click the Status button to obtain an updated agent status.
- Red: Indicates that the agent will not be successful if execution is attempted. There are several red status definitions:
- Inactive: The agent's setting is not active. To remedy this problem, navigate to Admin > Agents, edit the agent, select the Active checkbox, then click Update.
- Offline: The Eggplant Manager application cannot establish one-way communication from the server to the agent. Check to see that the agent is running and that you configured the agent in Eggplant Manager to use the correct port. Also check your firewall configuration to make sure it is not blocking incoming requests.
- Communication Error: The Eggplant Manager application established one-way communication from the server to the agent, however there is no established communication from the agent to the server. Check the server firewall to make sure it is not blocking incoming external requests on the server port (usually port 8080).
- Incompatible: The agent version is not compatible with the server version These versions must match.
Specifying Ports for an Agent
In some configurations, you need to use a different port for an Eggplant Manager agent. To change this, you'll need to edit the configuration file on the agent machine.
- Stop all Eggplant Manager processes on the agent machine.
- On the agent machine, open the em_config.yml file. Note: If you are going to alter the em_config.yml file, it is a good idea to make a backup copy of that file outside the Eggplant Manager installation directory.Look for the em_config.yml file in the following locations, depending on your operating system:
Mac: /Library/TestPlant/cache/
Windows: C:\TestPlant\cache\
Linux: /opt/TestPlant/cache/
- Find the :agent: section of that file, and change
:agent:
:port: '3100':to
:agent:
:port: '<the new port number>': - Save the file.
- Restart Eggplant Manager agent processes on the agent machine as shown in starting and stopping an agent.
